A High-Powered, Paid Option
The ☞ Nero Computing Platform is another Google Cloud-based computational environment that charges based on storage and computational resource usage, and can support large, computationally-intensive analyses. To use this platform for analytic purposes, coding skills are necessary.
Recommended for: Research teams that (1) only contain Stanford personnel/students and individuals with fully-sponsored SUNets (i.e with a Stanford email address), (2) who have the necessary IRB/DRA/DUA agreement(s), (3) funding and a valid PTA, and (4) whose projects are >10TB, need a lot of GPUs, need complex code to run interrupted, or want to use GCP services like BigQuery, Cloud Storage, Compute Engine, etc.
Optimal Use
- R & RStudio
- Python
- SQL
- Stata (purchase of a license needed)
- Slurm & terminal consoles available
- Is Cloud-based & accessed via a web-browser.
Costs
These machines are in Google Cloud so there are cloud costs and setup costs but they are not prohibitive. Approximately $100- 400/month for a typical machine.
You can access Google’s price calculator here (though there’s a Stanford discount that is not reflected in the calculator)
Benefits
- Stability: Because Nero is based in Google Cloud, downtimes are extremely rare.
- Flexibility: The computational resource allocation is customizable to your team's needs.
- Power: It can handle both computationally-intense methods and large cuts of data.
- Speed: Queries run quickly once sufficient computational resources are allocated.
Other Considerations
- Slightly more complex to bring data from Redivis into Nero: Must export the data from Redivis to Carina (and depending on the size of the data cut, approval may need to be requested for that through the PHS Data Portal), and then from Carina to Nero GCP.
- You can work with SRC to set guardrails to prevent unexpected costs.
- If a dataset is updated, you will have to export a cut of that update from Redivis to Nero in order for it to show up on Nero.
- May not be ideal for Stata or SAS. Both languages are supported in Nero, but the Jupyter Notebook environment may be less familiar to those accustomed to the desktop applications.
- You are responsible for ensuring that everyone with access to your Nero Project is currently fully approved (on the PHS Data Portal) to access the data that is stored within your Nero Project. Those not currently approved on the PHS Data Portal should not have access to the Nero Project or to the data.
Using the Platform
Prerequisites
Before using the Nero computing platform, you must first:
- Install Cardinal Key (see the ☞ instructions)
- Install Cisco AnyConnect VPN (see the ☞ instructions)
Connecting to Nero GCP
Please refer to this demo video, or to the steps below:
(1) Connect to Stanford VPN
Before visiting Nero, you need to join the Stanford Virtual Private Network (VPN) to secure your connection line.
- Launch Cisco AnyConnect VPN client app
- Select su-vpn.stanford.edu (or one of the other full-tunnel VPN options) from the drop down menu and click the "Connect" button.

Figure 1: The user interface of Cisco AnyConnect VPN client on Mac OS
"I can't login using the Cardinal Key" ☞ click here to troubleshoot.
(2) Go to the Nero GCP webpage
- Launch a web browser (e.g., Chrome, Firefox, IE) from your personal computer and type the address ☞ console.cloud.google.com. This address will bring you to the Google Cloud Platform.
(3) Select your desired project
- Demonstrated here.
Navigating Nero GCP
Within Nero GCP, there are several different capabilities you may with to access.
- Data Storage Buckets: Guidance here
- BigQuery Data Querying: Guidance here
- Compute Engine(s) for Statistical Analysis : Guidance here
The Compute Engines take the form of a ☞ JupyterLab web interface. Using this interface, you can write and run codes anywhere using modern data processing languages, such as, Python, R, SAS and Stata, in the form of a Notebook.
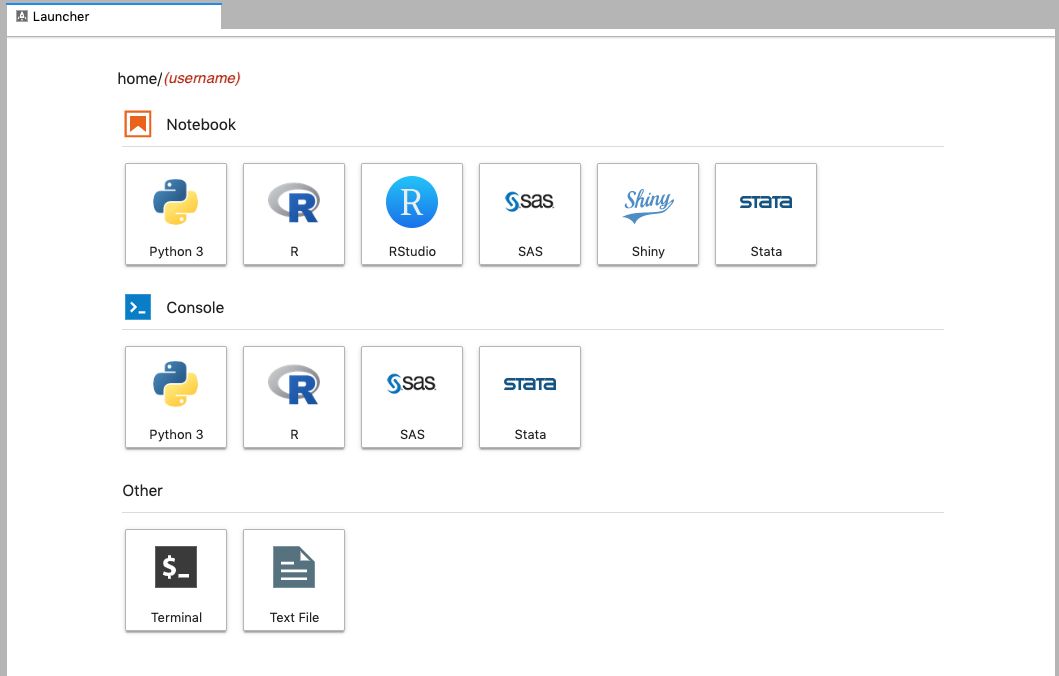
Figure 2: The JupyterLab Launcher UI tab on Nero
You will also have access to a Home folder and a shared directory within the Compute Engine.
IMPORTANT NOTE: You must disconnect/stop your compute engine when you finish your computational task because y**_ _ ** __ou are charged money for the time that the compute engine is running. Instructions on how to stop the compute engine are available here.
Transferring Data to Nero GCP
Transferring PHS Data
- Sign-up for (free) Carina Access
- Export the data from Redivis to Carina
- Upload the data from Carina to Nero GCP
Transferring Local Data (such as from your laptop)
Transfer from laptop to Nero GCP (the process is the same as in this video, except that you do it from your laptop rather than from the no-longer-in-existance Nero on-premise):
- This requires certain command line tools. Select one, then download and install it.
- Run the Google Cloud Shell or Terminal.
- Type "gcloud auth login" to authenticate with your stanford account.
- Sample transfer of a local folder to Nero GCP bucket:
gsutil -m rsync -r /local/folder/to/transfergs://nero-gcp-bucket-name-here/
Note: Some users can create buckets in their Nero GCP projects to transfer to. If you need a bucket to be created for you, please email srcc-support@stanford.edu for assistance.
Common Tasks within Nero GCP
Creating a Notebook
In this documentation, we are going to give an introduction to Jupyter Notebook on Nero using Python as an example. To create a new Python notebook project, click "Python 3" under the Notebook section. Other data processing languages are also available, such as: R, SAS and Stata.
Figure 4: An animated demonstration on creating a new Jupyter notebook on Nero
Writing Code
Note: This is not a Python tutorial and this section is intended to give a quick look of the Jupyter Notebook on Nero.
In the Jupyter Notebook, you write a piece of code in a space called the cell, represented by a one-line empty text field. The height of the cell is adaptable to the size of your code, so it can get bigger. To run the code, press the SHIFT + ENTER keys on your keyboard or select "Run > Run Selected Cells" on the top menu bar.

Figure 5: Executing a Python command on Jupyter notebook (press Shift+Enter)
If there is an output to be displayed, the notebook will display it immediately at the bottom of the cell, as illustrated by the example above.
Writing Documentation
The Jupyter Notebook supports the ☞ Markdown syntax to write a well-form documentation text. Similar to writing the Python code, you will write the Markdown-formatted text in a cell too. However, you need to change the setting for that specific cell from "Code" to "Markdown" as illustrated by the image below.
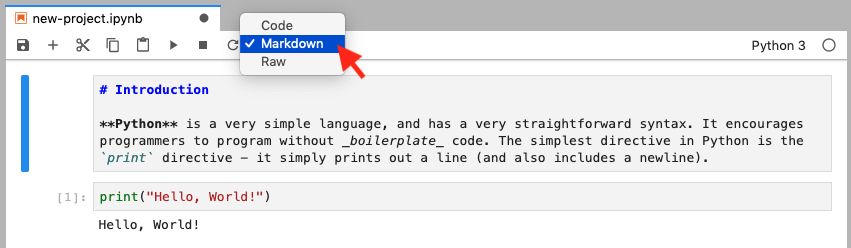
Figure 6: Switching between the "Code" mode and the "Markdown" mode on Jupyter notebook. Use the Markdown mode to write a documentation.
Use the same command: SHIFT + ENTER to render the Markdown-formatted text into a styled text.
Check these excellent public notebooks to see what other people have made and learn from them:
The Need for Openness in Data Journalism, by Brian Keegan; San Francisco's Drug Geography, a GIS analysis of public crime data in SF, by Lance Martin; Kaggle Competition: Titanic Machine Learning from Disaster, By Andrew Conti.
Appendix A: Changing the Kernel to R, SAS or Stata
The Jupyter Notebook on Nero supports other programming kernels, such as: R, SAS and Stata. You can select the different kernel from the beginning using the "Launcher" page, or you can change dynamically by selecting an item from the drop-down menu, as illustrated by the image below.
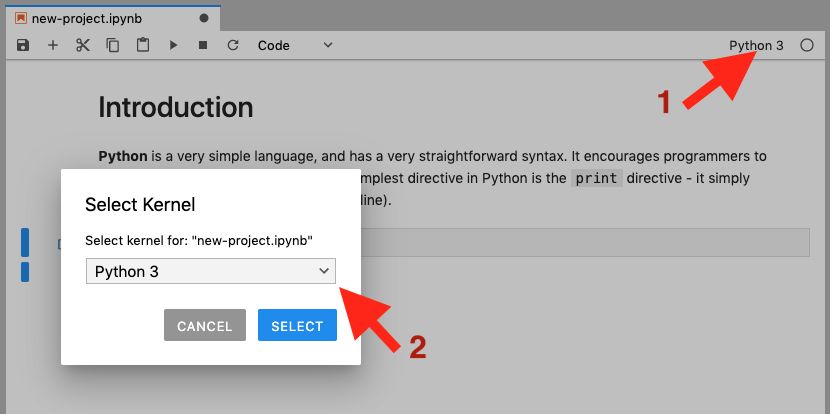
Figure 7: Switching different kernels on Jupyter notebook
Appendix B: Important Jupyter Notebook Shortcuts
The table below shows several important keyboard shortcuts to speed-up your work in the Jupyter Notebook.
Note: You might need to enter the "command mode" first (by pressing the Esc button) to execute some of the shortcuts below (e.g., A = insert cell above, M = change the cell type to Markdown).
| Keyboard shortcut | Action |
|---|---|
Esc | Enter the command mode. |
Enter | Enter the edit mode. |
Shift + Enter | Run the current cell, and then select the cell below. |
Ctrl + Enter | Just run the current cell. |
A | Insert cell (A)bove. |
B | Insert cell (B)elow. |
D (press the key twice) | Delete the selected cell. |
Y | Change the cell type to "Code". |
M | Change the cell type to "(M)arkdown". |
H | Show all shortcuts. |
Appendix C: Common Markdown Writing Syntax
The table below shows several common Markdown syntax to create a documentation in your notebook.
| Markdown | Action |
|---|---|
| # Heading 1 | Heading level 1. (Use 2 '#' symbols for heading level 2, 3 '#' symbols for heading level 3, and so on.) |
| Bold | Make a bold text. |
| Italic | Make an italicized text. |
| Make an ordered list. |
* First item* Second item * Third item | Make an unordered list. |
Inline code | Make an inline code. |
<br>Block<font color="#444444"><span><br></span></font>Code<br> | Make a block of code. |
| Text | Make a link, e.g., Duck Duck Go |
More reading resources:
- Basic syntax: ☞ https://www.markdownguide.org/basic-syntax/
- Extended syntax: ☞ https://www.markdownguide.org/extended-syntax/
- Jupyter Notebook supports LaTeX equation syntax to write mathematical formulas in your documentation: ☞ https://en.wikibooks.org/wiki/LaTeX/Mathematics
Additional Nero Resources
Overview of Nero GCP: https://nero-docs.stanford.edu/gcp-overview.html
Comparison of Nero and Carina: https://carinadocs.stanford.edu/prem-vs-cloud
Nero Account Request Form (Click 'Order Nero GCP' in the bottom left): https://nero-docs.stanford.edu
Introduction to Nero GCP Webinar: Here
Nero Support: https://nero-docs.stanford.edu/help-and-support.html
Nero Office Hours: https://calendly.com/srcc-officehours/nero-officehours
Support Email Address: srcc-support@stanford.edu
Nero Slack Channel: #nero-users